Home..........About..........Online Shop..........Etsy Shop..........Folksy Shop..........Newsletter....

Sunday, May 31, 2009

May Giveaway Winner

Before I tell you who won the May Giveaway, I want to say how touched I was to get so many entries! 733 comments were left under this post and you overwhelmed me with all the love you have for my little mice, thank you from the bottom of my heart.

To show you my gratitude there will be more prizes to win in the June Giveaway. But you will have to come back tomorrow to get all the details. I don't want to spoil the surprise just yet.

Now I know you are all sitting on the edge of your seat waiting to find out who won the May Giveaway, so I won't keep you in suspense any longer...

The winner is... Ariela

Congratulations!!

Ariela can now choose any mouse from my store
worth up to $40 as her prize!

Sorry to those of you that didn't win this time, I wish I could give you all a mouse each. But don't worry, you have plenty more chances to win; I am running this monthly giveaway for another 11 months. So make sure you come back tomorrow to find out what wonderful prizes will be on offer in the June Giveaway!

Tomorrow I also have some more news on a very special promotion I will be running in my store. You will be so excited, I know I am!

Saturday, May 30, 2009

Artist Interview - Reclaim2Fame

Whilst collecting photos for a feature on my other blog For the Love of Cute, I stumbled across a store that made me chuckle. The more I looked through Wills store Reclaim2Fame the more the chuckle became a giggle, which multiplied until I was laughing out loud. I love Wills creations, their fun names and his wonderful descriptions. I had to know more about Will and his art, his interview makes me smile as much as his shop does.

PROFESSOR PORTLY
The Endlessly Curious Seeker Of Wisdom And Truth

Tell us a bit about yourself (name, location etc.)
William Wagenaar [call me Will]
Port Richey, Florida USA

Other than crafting what else do you do?
I am a student of Metaphysics and the creative process [perhaps they are the same thing]
I ride my bicycle and garden.

Have you always been an artist?
Always, I suspect in other lives as well but have no proof of that.

BELLE dress form sculpture

Tell us a bit about your creative process
I listen to the thoughts that precede the making of things.
Those thoughts often lead me to the objects needed to create something.
Nothing has ever fallen from the sky, still, 'miracles' have happened.
If I choose not to listen, my process becomes more difficult because I have not collected all that I need.
The collection process [salvaging and scavenging] takes a good deal of time and commitment.
If I force this process, it's a waste of time and money.
When I have it in my hands, I know that I need it. It is only a matter of time till I know why I need it.
But with one more piece of the puzzle, the image becomes more clear.

I try to see things anew, that takes practice. Sometimes I turn them upside down or sideways.
Turning things upside down in a thrift store or at the flea market can get strange looks and sometimes, well intended yet unhelpful corrections.
I have in my hands a nuclear ray gun. I stare at it in awe of its power and possibilities...
and then a kind voice will inform me: "it's a bicycle pump". "Oh, of course, Thanks"

Once I feel that I have most of what I need, I play and try not to limit my possibilities.
If I can get two or three pieces of anything to make sense together, the rest of the project usually unfolds easily.
It is about getting that first spark. Placing enough things together in different positions and things start to click.
If there is no click or spark, I put them down. They are not the right things or it is not the right day for those things.

POPS
The High Mileage / Low Maintenance Geriatric Steampunk Robot


I often ask a thing what it can be or wants to be... yes, I do! It is a playful technique.
The molecules of all matter spin at a high rate of speed, there is no such thing as an inanimate object.
An extraordinary intelligence holds it together, why would I not talk to that intelligence?
Then I listen for an answer, sometimes the answer is immediate, sometimes not.

Are you self taught?
I have a degree in commercial interior design from Harrington Institute in Chicago.
It was an excellent program, I was a voracious student.
Nature has also been my teacher. The laws of its beauty can be observed and applied.

Which of your creations is your favourite?
Sparky changed my life forever, I won't go backwards.

SPARKY
The Seriously Paranoid Robot


Where can we find you online?
My shop, Flickr page and a few dozen blogs. Just Google me.

If you would like to be considered for Featured Artist, please leave a comment under this post and tell me which Wills's creations of you love the most!

Only ONE day left to WIN a mouse!


Just a little reminder that there are just ONE DAY left for you to enter my May Giveaway and win yourself a free mouse of your choice from my store!

To enter just click HERE and leave a comment, you can comment as many times as you like to increase your chances of winning!

Thursday, May 28, 2009

Ironmouse

I was asked to make a custom Ironman Mouse recently, he was a very tricky mouse to make and my first attempt was just not right. So I restarted him from scratch and using card instead of felt for his amour. He took me about 5 hours to make from start to finish. I have to say after all that work that I am pleased with the final result, but I won't be making him a regular in my store, he would be too expensive because of the amount of time he takes to make.


If you have any suggestions for mice I should make you can post them here. If you would like to order a custom mouse, feel free to contact me with your ideas.

Wednesday, May 27, 2009

Etsy Sellers tips - Shop Policies

A frequently overlooked part of an Etsy store is the policies section. Your store policies tell your customers what to expect from you. I am always sad when I see a store with no policies, because I know it is costing them sales. Customers look at your store policies to judge what kind of customer service you will offer; if there is nothing there they are likely to walk away.

Shop policies do not only help your customers but they also help the store owner stay consistent and have actions in place for certain situations.

You can find the page to edit your policies buy logging in to Etsy, click "your Etsy" and look for the "policies" link in the left hand column, click it.

Here are some things to consider when writing your store policies.

Welcome
  • You don't need to put a lot of information here, any personal information you want to share can be put in your profile. A brief introduction is fine here and you can encourage buyers to contact you if they have any questions.
Payment
  • State what methods of payment you will take (PayPal, cheque etc)
  • If you take PayPal, a brief description of how to pay with PayPal is useful. Lots of people don't realise they can use this method to pay with their credit or debit card without having to sign up for a PayPal account. It helps to explain how they can do this. This is what I say in my policies, you can copy and paste it if you want
"You do not need a PayPal Account to pay for your items through PayPal:

You can choose the PayPal Option during checkout. After you submit your order click the "Pay Now" button. Scroll Down and you will see the option to pay with a Credit or Debit Card WITHOUT having to sign up for a PayPal account."
  • State that you will not send packages until payments have cleared.
  • Encourage buyers to contact you if they are having any problems with payment
  • Tell your buyers what you will do in the event of non-payment. Non-payment is a common problem on Etsy, part of this is down to the way the system works there and it can be confusing to new buyers on Etsy, other times people are just messing you around. This forum post has some great advice on how to deal non-payment, but it helps to leave something about it in your policies too. Will you leave negative feedback for non-payment and no-response to emails? I do, but it is a personal choice. Whatever you decide, put it down in your policies. It will make it easier for you to follow through on it when non-payment happens to you.
  • If you offer payment plans explain how this works to your customers.
Shipping
  • Describe how your items are packaged: Do you gift wrap? Are your items sent in boxes? Do you include a certificate of authenticity? If you use recycled packaging write that in here too, Etsy buyers love sellers who do this.
  • Tell your buyers what shipping company you use.
  • What shipping do you offer? (priority, standard, first class, registered mail, online tracking?)
  • Can customers request faster shipping or insurance for an additional charge? If yes, ask them to contact you for more information.
  • If the Etsy and PayPal shipping addresses you receive for an order are different, what will you do? Some stores state if they have had no contact from the buyer within 3 working days then they will ship to the PayPal shipping address. Other sellers clearly say that they always ship to the address given during Etsy checkout. Decide which you will do and state it here (I used to say I would contact the buyer to confirm if their addresses were different, only once did the buyer say they wanted it shipped to their PayPal address, all others said the Etsy one. So now I always ship to the Etsy address, no more waiting around for buyers to get back to me) If you will automatically ship to a certain address make sure you include info on this in your "message to buyer" box as well.
  • Give information on estimated shipping times. If you have already done a lot of shipping you will have a good idea of how long a package takes to arrive in certain parts of the world. If you have not done much shipping yet, ask at your post office, and then add a few days to their estimated times. Packages almost always take longer to arrive than the PO says they will.
  • If you ship overseas, state that customs can delay packages by up to 6 weeks, say that this does not happen often but that it can happen. It is better to forewarn your buyers about this possible problem.
Refunds and Exchanges
  • If you don't want to do refunds and exchanges then put it politely. Something like "I'm sorry but at this time [insert shop name here] cannot accept refunds or exchanges, please purchase seriously" comes across a lot better than "No exchanges or refunds accepted"
  • If you are going to offer refunds and/or exchanges then put your terms and conditions here. How long after receiving an item can people ask you for an exchange or refund? Will you refund only the cost of the item or the shipping as well? If a buyer returns an item to you who is responsible for the return postal costs?
Additional Policies and FAQs
  • This is a great place for any custom order policies you have. If you take custom orders then you can talk about the process you go through for these orders.
  • An estimate of how long an order will take is good here, if it varies a lot then ask buyers to contact you for more information.
  • When you require payment. I recommend you at least take a deposit before starting work, unforeseen things can happen that may mean your buyer cannot pay you by the time you have finished working (this has happened to me in the past, I now require full payment before I start work)
  • Frequently Asked Questions, is pretty self explanatory. If you have some questions that you are always getting asked then this is the place to put them down with your answers. This won´t stop everyone as some people just don´t look hard enough for the answers, but it will help a few and you can just copy/paste them when you get convos about them.
Other tips for your policies.
  • Run your policies through a spell checker, and get someone else to proof-read them for you if you can. It looks unprofessional if you have spelling and grammar mistakes everywhere.
  • Keep a friendly and polite tone in your policies. Don´t get angry, confrontational or rude when you write them. Be clear and concise without being rude.
  • Re-read your policies as if they belonged to a shop you wanted to buy from. How would you feel as the customer when reading them? Make any changes you think you need.
  • Ask a friend if what you have written makes sense.
  • Sometimes people will write to you with questions about your policies. When this happens take note and if necessary make adjustments to your policies if you think they need it.
Here are my shop policies, I give you permission to copy and paste bits of it you feel are useful. However, make sure you actually agree with what I have written if you are copying it.

Did you find this post useful? Is there anything I left out that you think should be included? For links to other Etsy Sellers Tips I have written check out this page.

Tuesday, May 26, 2009

Hand picked favorites - Home

They say home is where the heart is, and I absolutely love all 6 of these items on the theme of house, home and garden. Perhaps it is particularly good choice of theme because we have been renovating our home a lot recently.
I hope you enjoy my choices this Tuesday.

Laundry Day
by atwhim

Birdhouse
by DoorCountyWoodworks

Tasket Set - Our House
by JennMaruskaDesign

Penguin Love. magic terrarium no. 04
by lapomme

Baba Yaga's Chicken Leg House
by MelissaSue

Chasm 1
by MKBartstudio

Monday, May 25, 2009

Blog Award and a Mouse

I have a new mouse to show you that I made as a custom order, but first...


I just received the One Lovely Blog Award from Leslie of Shrimp Salad Circus. Thanks so much! Now it's my turn to pass it on...
Here are the rules:
  • Accept the award, post it on your blog together with the name of the person who has granted the award, and his or her blog link.
  • Pass the award to 15 other blogs that you’ve newly discovered. Remember to contact the bloggers to let them know they have been chosen for this award.
  1. Beards
  2. PamerlaAngus
  3. BizzieLizzie
  4. Star of the East
  5. Handmadeology
  6. Mandibeads
  7. While Tangerine Dreams
  8. Ramblings from a Design Studio
  9. Tattered Tapestry
  10. Canadian Rockies Art
  11. Nun of a kind
  12. Mad Maggie Designs
  13. Etsy Moms
  14. ArtMind
  15. Arctida´s Creations
Everybody make sure to check out all these great blogs, and maybe you'll find a few that interest you to add to your 'follow' list!

....

I also have a new mouse to show you, I made him as a custom order but if my customer is ok with it, and you guys like him, then I might make him a regular in my store. When I showed Thor Mouse to my husband he went into raptures of joy and demanded one for himself. I didn´t know much about the character but maybe there are some other comic book geeks out there who think I should make him a regular in my store?

What do you think?

Sunday, May 24, 2009

Refurbishing my studio - Part 3

My studio is finally finished! I can't believe how much I have missed having my own creative space to work in. It is 10 times better than it was before. I have added loads of extra storage space - who would have thought the materials for making tiny little mice would take up so much room?! The walls are plastered - no more bumpy peeling wallpaper, yay! I have a nice new wooden floor. Now I can get on with crafting more mice than ever before. I hope you enjoy this tour around my shiny new studio.

Lots of new shelves and cabinets. Can you spot ArtMind's babushka dolls on my shelves? I think I need to buy some more soon. I love wind chimes and dreamcatchers hanging from my window. I wish I had more room for plants too.


My little photo corner with my light boxes. Soon I am going to write a tutorial on how to make a light box and use photo editing software to get your photos looking bright and beautiful.

My ribbon board is full! I think I am going to need to make another one soon. I have a little tool box full of beads and flowers, it is hanging on the wall under my pin board. I put my writing board on the wall and forgot to wipe off the old writing. It looks very odd with the writing on sideways! My new favourite addition to my work table is a pair of magnetic strips of metal on the wall. I can stick all my scissors too it and keep them out of my way.

Thanks for stopping by!

Saturday, May 23, 2009

Artist Interview - Petit Plat

I have always had an admiration for anyone who can produce miniatures with realistic detail. The skill involved in working so small is just amazing. This weeks Featured Artist has this skill in abundance! I am blown away by the detail in her tiny creations! I hope you will enjoy her interview and marvel at her tasty art.

Berries in Pink on Cupcake - Silver Sterling Earrings

Tell us a little bit about yourself
I’m Stéphanie and I live near Paris. I’m a happy mix of origins going from Russian to Polish, through German and French, but my nationality (the one on my passport) is French.

Other than creating art, what else do you do?
I’m still studying architecture, if everything goes fine, I’ll finish in a bit less than 2 months. I don’t intend working as an architect right now, though.

Have you always been an artist?
I see myself more as a sort of artisan. But since I remember I always crafted a lot, drawing, painting, knitting, …

Actually I wanted to become a painting artist when I was little :)

Tell us a bit about your creative process
I work in ‘our’ bedroom/room/living-room on two tables, which don’t have the same height. The higher one is good when I work on miniatures so I can sit straight. The other ‘normal’ height’ table is both for architecture and miniatures. Miniatures are always lying a bit everywhere, because I mostly don’t know right away how to arrange them.

I don’t have a weakly planning on when I miniaturize. I just do when I feel down or have time.

Selection of Breads on Bakers Tray - 1/12 miniature

How did you learn to create such detailed work? Are you self taught?
Yup. Self taught. But my friend google helped me a lot in my research of the best miniature work so I had a lot to look at in order to make my owns.

After this first google phase I bought the book Making Miniature Food from Angie Scarr. It’s a very well known book among miniaturists. I also got her second book which was published in April.

Are there any foods you particularly enjoy making?
I used to love making doughnuts, but that vanished. Now I would say breads and fruit tarts. Fruit tarts are a life time favourite I guess :)

I also really enjoy making “preparation boards” and gingerbread houses!

Ok chocolate is great as well!

Which of your creations is your favourite?
It really has to be this one


I really do love that salmon board and I’m still thrilled that my first attempt at making salmon turned out that great!

Where can we find you online?
Gee! I’m just everywhere, it’s hard for me to keep up!

So I sell on these sites:
PetitPlat.etsy.com
PetitPlat.artfire.com
PetitPlat.dawanda.com
cdhm.org/user/petitplat

And you can see my work on:
PetitPlat.110mb.com
flickr.com/photos/_sk
PetitPlatBySK.blogspot.com

Chocolate Orange Supreme - 1/12 miniature

If you would like to be considered for Featured Artist, please leave a comment under this post and tell me which Stéphanie's creations of you love the most! (you can pick more than one, I know it is hard to choose)

Friday, May 22, 2009

Disaster!

Total, complete and utter disaster. I have lost my mouse book. I had this wonderful little journal that I bought from Kreativlink that I kept all my mouse ideas in, and its gone!


I have searched the whole house for it, I think I must have left it in a café. Someone is going to be very confused when they open it.

It just has lists of ideas for mice I want to make like:
Dalek Mouse
Mouse Chess Set
Terminator Mouse
Fireman Mouse
Zodiac Mice
etc...
For pages and pages and pages! Some of them were suggestions other people had made to me too, and now all the ideas are gone.

Can you help me make a new list by suggesting mice you would like to see in my store? Fortunately I have another of Kreativlink's journals that I can put the new ideas in, this one will not be leaving the house!

Thursday, May 21, 2009

Etsy Mini Part 4 - How to make a Featured Artist Etsy Mini

This is Part 4 of my tutorials on using the Etsy Mini Widget, here I will show you how to tweak the Etsy Mini HTML code so you can feature other artists.

For more information on using your Etsy Mini:
Part 1 - What is an Etsy Mini? How to build an Etsy Mini
Part 2 - How to post an Etsy Mini on your blog
Part 3 - How to post an Etsy Mini on your Facebook Page

It is possible to make an Etsy mini from another store, for example if you wanted to have an “artist of the week” Etsy mini on your blog. The trick is to make an Etsy mini for your own store, in the dimensions and size that you want your featured artist to have on your blog. Then you need to find their user_id and replace yours for theirs.

Here's an example. Let´s say I wanted to make an Etsy mini from this great store I found recently called reclaim2fame.etsy.com. First I would build an Etsy Mini for my own store, making it the size and dimensions I want to show reclaim2fame´s listings in.

This is the code I get for that:

I copy and paste that code into a word document so I can edit it a bit later.

Now, I want to turn it into an Etsy mini for reclaim2fame´s store. All I need to do it look at his Etsy shop Policies page. The url will look something like http://www.etsy.com/shop_...user_id=5932649. The bit I need is his user id 5932649.

So I take the Etsy mini code for my store, and I replace my own Etsy id with his like this:

Code for my storeBecomes Code for reclaim2fame´s Etsy Mini

By using this technique you can create an Etsy mini for any store you like, without needing to convo the seller to ask them to build one for you.

For more information on using your Etsy Mini:
Part 1 - What is an Etsy Mini? How to build an Etsy Mini
Part 2 - How to post an Etsy Mini on your blog
Part 3 - How to post an Etsy Mini on your Facebook Page

Etsy Mini Part 3 - How to put an Etsy Mini on your Facebook Page

This is Part 3 of my tutorials on using the Etsy Mini Widget, here I will show you how to add your Etsy Mini to your Facebook Page.

For more information on using your Etsy Mini:
Part 1 - What is an Etsy Mini? How to build an Etsy Mini
Part 2 - How to post an Etsy Mini on your blog
Part 4 - How to tweak the Etsy Mini HTML code so you can feature other artists.

There are 2 ways to post your Etsy Mini on your Facebook page.
  • Using the Etsy Mini Application. This allows you to show up to 6 items from your store or your favourites. This way is relatively easy to set up.
  • Using the My Stuff Application. This allows you to more of your items in one go. An Etsy Mini of 5x4 looks great here. However it is more complicated to set this up.
Using the Etsy Mini Application
1) Click on this link to go to the Etsy Application Page
2) Click "Go to Application" and then click "Allow"
3) Once you have it installed go to your settings and choose "Application Settings"

4) Select "Etsy Shop" on the list
5) On the next page select "Edit Your Settings"
6) Here you can enter your Etsy Shop name, the number of items you want to show (the maximum is 6, and if you want to show from your favourites or your own store items.
7) When you are happy with your selection, click "Save"


8) You won't be able to see your Etsy Shop application on your profile wall yet. We need to fix this now. To do this go to your profile and click the "Boxes" Tab at the top of the page.

9) Scroll until you find your "Etsy Shop" Application. In the top right corner you will see an icon that looks like a pencil. Click it and select "Move to Wall tab"


10) Your Etsy Shop Application will now have moved to the bar on the left of your profile page. You can move it up and down by clicking and dragging the box around until you are happy with where it sits.


Using the My Stuff Application to put an Etsy Mini on your Facebook Page
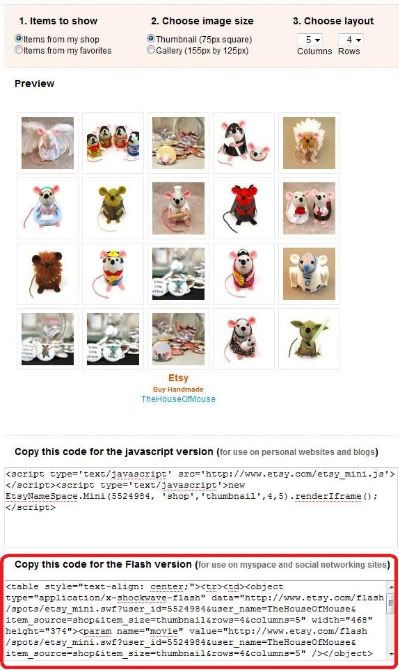
1) Build an Etsy Mini that has thumbnail size images and a grid of 5 columns and 4 rows (this size looks best on your facebook page)
2) Copy the Flash Code (second box down) and save it to a word file.

3) Log into Facebook
4) Click this link to go to the My Stuff application
5) Click "go to application" and then "allow"
6) The application will appear on your page blank. At the bottom you will see a Box that says "add code"
7) Paste your Flash Code into this box and click "Add to Profile" to see it appear.

8) You can add multiple things to your My Stuff application, including other Etsy Minis, videos and anything else in HTML format. But when the My Stuff app is on your profile wall it will only show the top item. Therefore it makes sense to make sure your Etsy Mini is at the top.
9) When you are finished go to your Facebook profile. You won't be able to see your My Stuff application on your wall yet. We need to fix this now. To do this click the "Boxes" Tab on your Profile page. If you can't see it try clicking the "+" tab and look for "boxes" if you still don't see it then this is a Facebook bug, you will just have to be patient and come back to it later.

10) Now you have your boxes Tab open scroll until you find your "My Stuff" Application. In the top right corner you will see an icon that looks like a pencil. Click it and select "Move to Wall tab"

11) Your My Stuff Application will now have moved to the bar on the left of your profile page. You can move it up and down by clicking and dragging the box around until you are happy with where it sits.


For more information on using your Etsy Mini:
Part 1 - What is an Etsy Mini? How to build an Etsy Mini
Part 2 - How to post an Etsy Mini on your blog
Part 4 - How to tweak the Etsy Mini HTML code so you can feature other artists.

Etsy Mini Part 2 - How to put an Etsy Mini on your Blog

This is Part 2 of my tutorials on using the Etsy Mini Widget - here I will show you how to add your Etsy Mini to your your blog sidebar and into a post.
(This tutorial is for Blogger only, Wordpress does not support any Etsy Mini code)

For more information on using your Etsy Mini:
Part 1 - What is an Etsy Mini? How to build an Etsy Mini
Part 3 - How to post an Etsy Mini on your Facebook Page
Part 4 - How to tweak the Etsy Mini HTML code so you can feature other artists.

How to put an Etsy Mini in a blog sidebar
Blog sidebars are narrow, so you need to make sure that the Etsy Mini you build to go here is only one column wide for gallery size images or 2 columns wide for thumbnail size.

1) Once you have built the mini you want to use, copy the Javascript code (the top box) and save it in a text document. Alternatively you can just keep your Etsy mini builder open in a separate tab/window so you can come back to it later.
2) Log into Blogger
3) Click on "Dashboard"
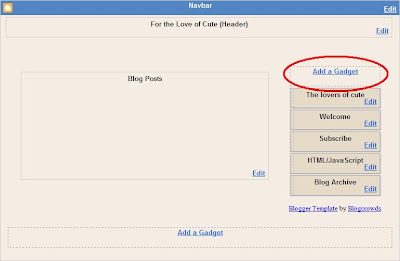
4) Click on "Layout" this will take you to the customize page of your blog.
5) Click on "Add a Gadget"


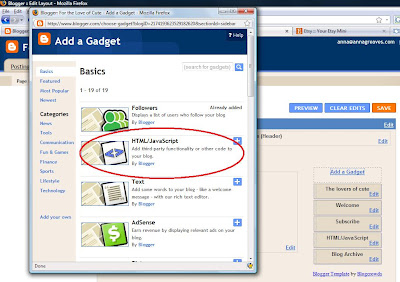
6) A selection of Gadgets for your blog will pop up. For the Etsy Mini you need to select "HTML Gadget"
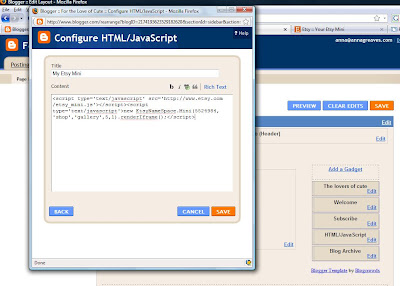
7) In the next window give your Etsy Mini a name (optional), paste your JavaScript code into the main box and click "Save".

8) You can move your Gadgets around by clicking and dragging them. When you are happy with your layout just click "Save"

- You can add multiple Etsy minis to the same gadget if you want, just paste more code underneath the first. However I think it works better to create a new html gadget for each Etsy mini, it makes it much easier when you want to move things around on your blog.

How to put an Etsy Mini in a blog post
1) Log into your blog and then click "New Post"
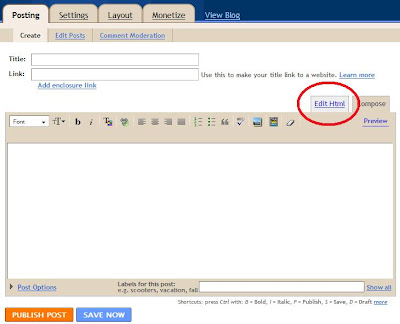
2) Then Click the "Edit HTML" tab

3) Paste the JavaScript code for your Etsy Mini into the box. If you click the "compose" or "preview" tab you wont be able to see your Etsy Mini. This is ok, just so long as the code is in your "Edit HTML" tab you will be able to see it on your blog when it is published.

For more information on using your Etsy Mini:
Part 1 - What is an Etsy Mini? How to build an Etsy Mini
Part 3 - How to post an Etsy Mini on your Facebook Page
Part 4 - How to tweak the Etsy Mini HTML code so you can feature other artists.

Etsy Mini Part 1 - How to build an Etsy Mini

This tutorial and the ones to follow will show you everything I know about the Etsy Mini Widget. Part 1 will introduce you to the Etsy Mini and show you how to build one.

For more information on using your Etsy Mini:
Part 2 - How to post an Etsy Mini on your blog
Part 3 - How to post an Etsy Mini on your Facebook Page
Part 4 - How to tweak the Etsy Mini HTML code so you can feature other artists.

What is an Etsy Mini?
The Etsy Mini is a clever little gadget that shows items from your Etsy store, or from your favourites. You can see 3 of them in the sidebars of this blog, for my own store, my favourites and for this weeks featured artist. The code supplied by Etsy allows you to show a little window into etsy, and no matter where you put the Etsy Mini code, it will update itself to show your most featured items, recent items or your favorites.

How to Build an Etsy Mini
To find the Etsy Mini Builder
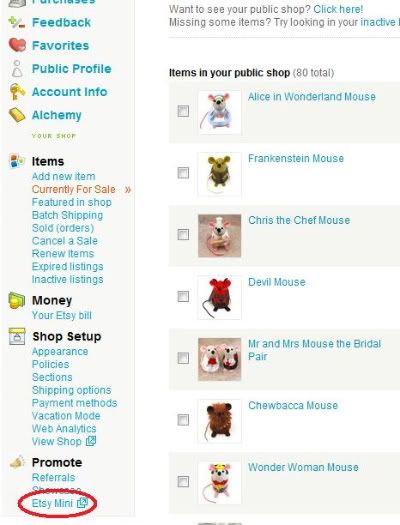
1) Log on to Etsy
2) Click on "Your Etsy" at the top of the page
3) You will find the Etsy Mini link at the bottom of the left hand bar

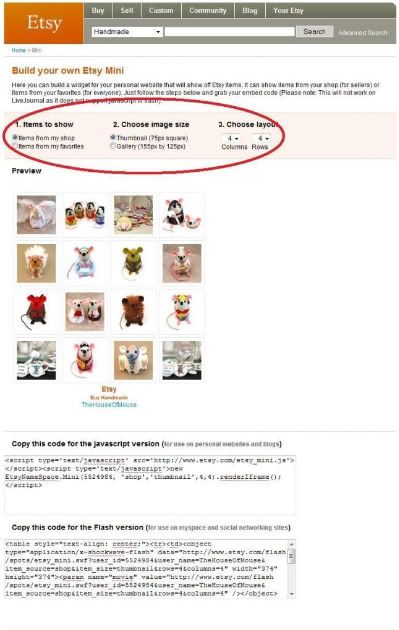
4) The Next page will give you a few options to choose from. You can choose to show items from your store or from your favourites, the size of the images and the proportions of your Etsy mini. 5) When you have made all 3 selections an example of your Etsy mini will show below, you can continue to edit it until you are happy with how it looks.

6) When you are happy with how your new Etsy Mini looks it is time to grab some code. Etsy provides 2 different codes for you to use, depending on where you want to put your Etsy mini. If you are posting the code on a blog then you will need the JavaScript code, if you are posting on MySpace or Facebook you will need the Flash Code instead.

For more information on using your Etsy Mini:
Part 2 - How to post an Etsy Mini on your blog
Part 3 - How to post an Etsy Mini on your Facebook Page
Part 4 - How to tweak the Etsy Mini HTML code so you can feature other artists.

Wednesday, May 20, 2009

Textiel Plus - Magazine interview

I am SOOO excited because the Dutch Magazine Textiel Plus came out today, and The House of Mouse is featured in it! I am extra excited because this is the first time that I have ever been published. (Just to give you a hint of how happy I am, I am working very hard not to over use the exclamation mark on my keybord)

Textiel Plus is a Dutch magazine, and so the article is not in English. For all my non-Dutch readers (about 80% of you) below is a translation - a BIG thank you to my friend Inger for writing the translation for me.


Anna Greaves is a painter by origin with a preference for self-portrait painting. The felt mice, which she gave to friends and family were greeted with such enthusiasm that she has continued adding to her mouse collection with great ingenuity and creativity.

The little grey and brown mice stand 6 to 7 cm high, with pink ears, feet and tails. At first sight they all are cute and funny but upon closer examination you discover they are not just mice, but characters and personalities. Some stand out because of their profession as schoolteacher, doctor, ballet dancer or geisha. Celebrities like Elvis Presley, Andy Warhol and Frida Kahlo draw the attention just as Vincent van Gogh (one eared, so unmistakable). So too are part of the mouse family Harry Potter, Hermione Granger just as Princess Leia and Luke Skywalker or Yoda from the Star Wars series. But beware there are some gruesome ones too like Frankenstein or Hannibal Lecter.

Looking from a mouse perspective.
Anna brings her little mice to life with all kinds of materials. "The basic mouse is nearly always made from brown or grey felt, sometimes from furry material or even patent leather. For their costumes and accessories I use ribbons, fabric pieces, beads, buttons and metal wire. I am always on the lookout for usable accessories. The sunvisor for example is a Barbie accessory. The fleamarket is scoured from a mouse perspective and I will find the most amazing things, like these metal buttons, that are actually quite ugly, which are perfect as a shield for the gladiator mouse."

Mousehole
The felt mice didn't just appear out of nowhere. There is a history related to them. "My grandparents had a little store in the village called Mousehole in Cornwall (southwest England) where they sold "mouse things". My grandfather was a painter and potter. On his mugs and bowls he added a little mouse logo. My grandmother made little felt mice that she dressed with ribbon and fabric. I only have vague memories of her, but at my parents house there are still some mice looking at you from hidden corners. They are a different design from my mice in that they are smaller and the nose is different, but they did give me the idea to make some as Christmas presents for family and friends. They got such a great reception that I never stopped adding to the collection."

Internet
Following that Anna opened her Etsy store on internet, an American site for handmade products. "Because everyone was so encouraging I made the step to start selling them. I take pictures of all the mice I make, these pictures can be seen in my Etsy store. It is a great success. Incredible how far my store has come in one year. My sold mice live all over the world, USA, Japan, Canada, Spain, Australia. And some really fun relationships have formed. Customers will tell me where their mouse is living, or sometimes I get letters from people telling me that they and their 5 yr old daughter have been looking at my store for an hour. Even if they don't buy one, they give so much fun and joy, it is very special to be able to make people smile and feel happy.

Creative talent
Anna Greaves was born and raised in England. Creating, drawing, crafting, music have been part of her life since she was very young. "After school I started studying psychology, a solid choice, but after just one semester I was sure only a creative job would suit me. After 3 yrs of art school in Plymouth we moved to the Netherlands because my husband got offered a job there. My final year I did at the Willem De Kooning Academy in Rotterdam. Actually I had quite a different expectation of art school. Traditional art has very little focus there as opposed to conceptual art. I would have liked to learn all about the techniques used by Rembrandt and Vermeer, and the business side of being an artist. I have had to discover much of that myself. It has been quite a tough time due to the transition to an other country, but in the end well worth it.

Craft studio
Anna creates her mice in the loft of her house. Her studio is very practical. Yarn and ribbon neatly organised. A group of naked mice await their clothes. Shelves on the wall contain boxes of dressed mice. Anna opens a couple and takes a Sinterklaas one out, followed by a James Bond one, a Gesha, Yoda from Star Wars with a straw as lightsaber and very current a Barack Obamouse. Packaging and shipping takes place in a different part of her studio. There too she makes her mice pictures for on cards and buttons, two more mice products in her store. On a planning board she keeps track of stock and orders. "Actually I am not this organised all the time, but I try to be, or I will lose track"

The mice are in charge
The cheerful and enthusiastic way in which Anna tells of her mice family illustrates the pleasure she derives from creating them. "It is so much fun to do and I still have so many ideas and inspiration. Others too give me ideas and my husband is pure genius in coming up with new characters. Some customers have personal wishes. I made a bumblebee mouse, a penguin mouse, a bunny and a bear. For now I am keeping to my mice, but sometimes it is fun to make something like a hedgehog or owl. I like doing something different all the time and letting my creativity flow. My paintings are at this point my hobby, just for myself. I am short of time and painting will come again later, but for now the mice are in charge"

~

Textiel Plus is sold in a limited number of stores. If you live in Holland and would like to get hold of a real copy, send me an email telling me which city you live in and I will let you know the closest store that will have it.

Popular Posts